Rsudp v0.4.0 released!


Some of you may know that I’ve been working on a piece of software that can ingest, live-plot, and process Raspberry Shake UDP data casts. Today we are quite excited and proud to officially release rsudp to the community!

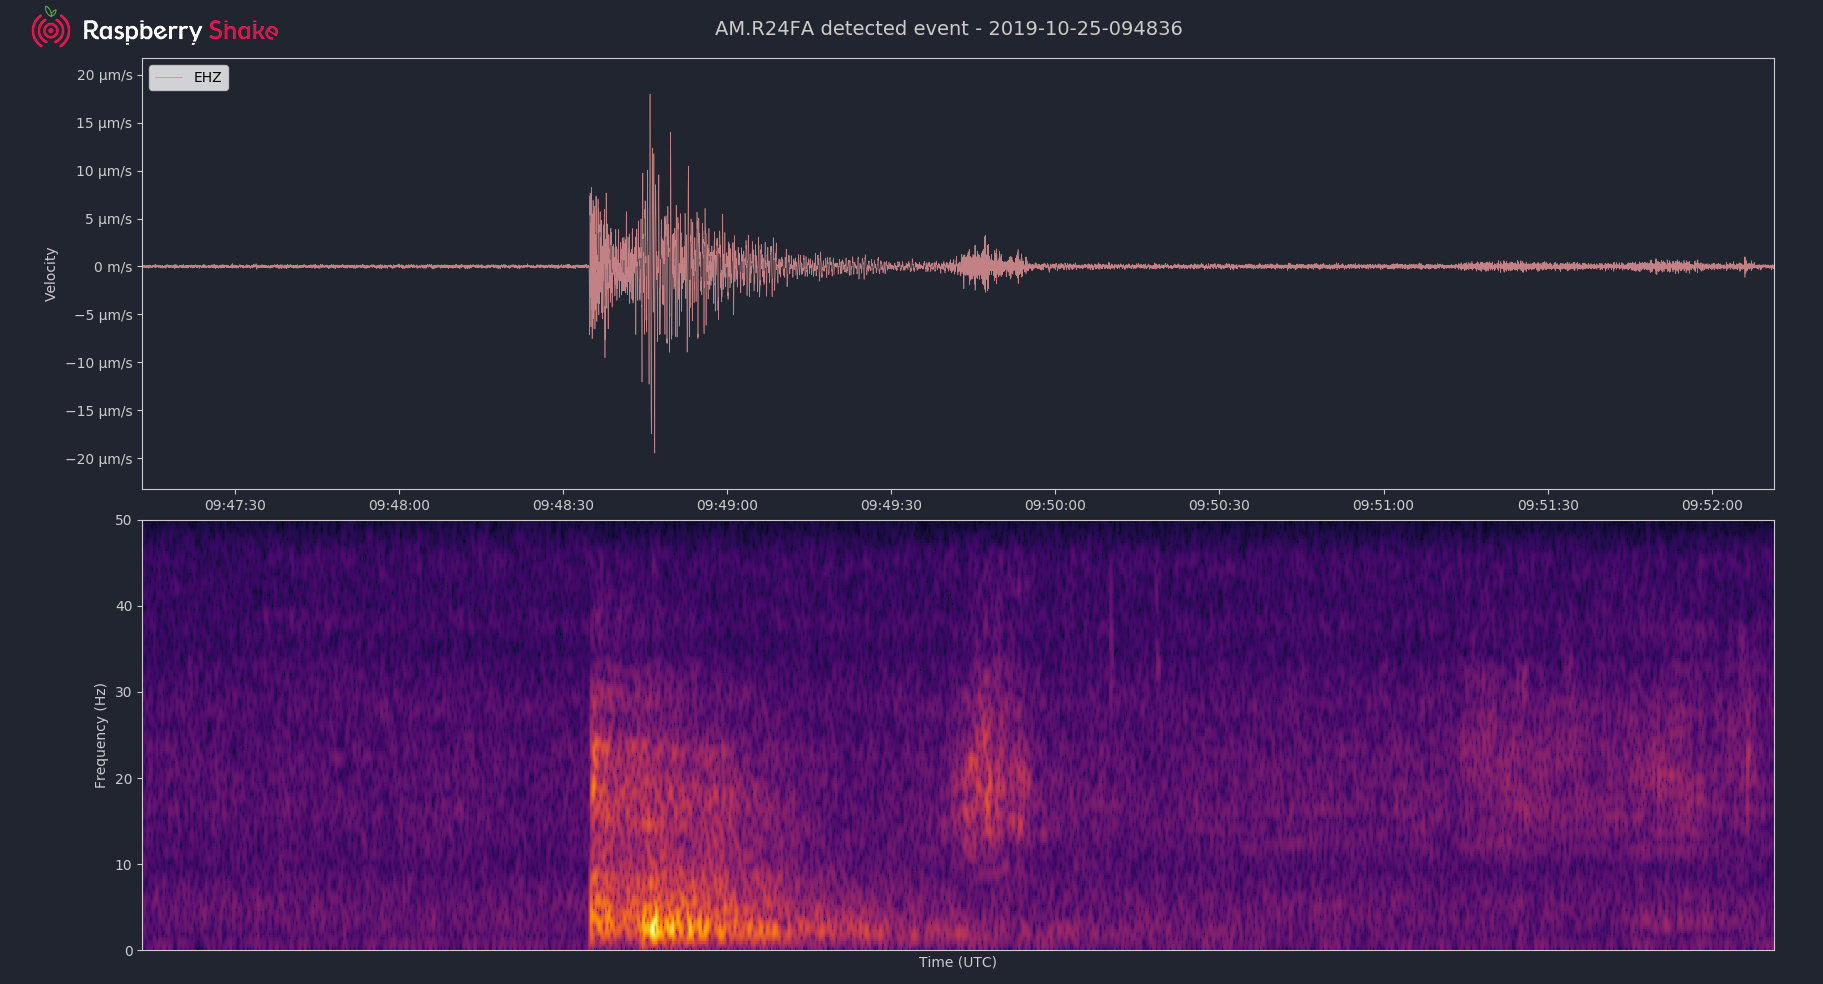
Before we get into installation, check out a replay of rsudp detecting a M 4.3 earthquake 80 km away on a Raspberry Shake and Boom, which was pulled from our livestream:

Installation

First of all, the software lives at GitHub - raspishake/rsudp: Continuous visual display, sudden motion monitoring, and historical replay of Raspberry Shake data. First-time installation instructions are here: GitHub - raspishake/rsudp: Continuous visual display, sudden motion monitoring, and historical replay of Raspberry Shake data, and I also give a tutorial in the video below. When using the UNIX installer script, please make sure to read and follow the directions in the prompts.

Installation tutorial

Setting up a UDP data cast / UDP stream

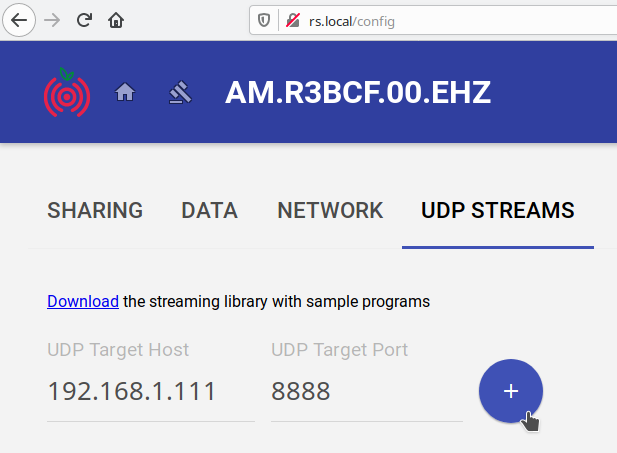
Before you run this software, you will need to point a Raspberry Shake UDP stream at the machine you will run this software on. For that, you will need to find the IP address and port of your computer, and enter those values into the UDP Streams tab of the Config page on your Shake’s web front-end. Press the plus button and then press SAVE. This is what that looks like on v.15, the current version of the Shake software:
image

Setting up and running rsudp

Before running the software, you may need to edit the settings file that is created during installation. To do so on Linux or Mac OS, execute the following command in a terminal window:

nano ~/.config/rsudp/rsudp_settings.json

On Windows, open ~/.config/rsudp/rsudp_settings.json with your favorite editor, and edit the values to your liking.

I explain the behavior of most of the settings values in the following video tutorial, but they are also explained in the Modules section of the README: GitHub - raspishake/rsudp: Continuous visual display, sudden motion monitoring, and historical replay of Raspberry Shake data

Setup and run tutorial

Note: Mac OS and Linux users can also start rsudp using the bash script unix-start-rsudp.sh, i.e.:

bash unix-start-rsudp.sh

Streaming

The next YouTube video in this series (coming soon) will describe the process of setting up a live video stream from a computer to YouTube using the fantastic Open Broadcaster Software (OBS) project (which, unfortunately, doesn’t work on Raspberry Pi yet).

Our example livestream is here: Raspberry Shake - YouTube
It’s also simulcast on Twitch.tv/raspishake.

Issues

If you encounter problems, please post questions to the forum or create a new GitHub issue at Sign in to GitHub · GitHub. Please describe the problem clearly and concisely, and as always, include the log files from your Shake’s web front end.

Issues will almost certainly arise if you are trying to send a UDP stream through a firewall (from a remote location to a home router or university network, for example). This is possible but you will either need to talk to your network administrator or Internet Service Provider, or read the instructions on how to set up external-to-internal Port Forwarding on your home router. Like during the Shake setup, it’s best to try using this on a local home network first, where there are unlikely to be firewalls between you and the Shake.

Contributing

This software is open-source and we welcome contributions from the community! Have an idea for a Twitter bot that posts when the alarm is triggered? Want to write a module that turns on a GPIO pin during an alarm? If you can improve rsudp we would love to hear from you!

Final thoughts

I think that’s it for now. Check it out, play around with it, let us know what you think, and be sure to post images of earthquakes by setting "eq_screenshots": true, in your settings file!

Yes, sorry if that is unclear: once you are in the conda environment, the rs-client command becomes available to start the program. This is taken care by the Unix script, and if someone wants to write an equivalent Windows bash script that would probably make this process a lot easier for Windows users!

Good catch. That’s been fixed.

Not sure how to start a new question. Trying to Install Rsudp on MacOSX High Sierra.

Received this error message:

Press any key to continue or Ctrl+C to exit…

https://repo.anaconda.com/miniconda/Miniconda3-4.7.12-MacOSX-x86_64.sh: Unsupported scheme.
Something went wrong downloading miniconda3. Check the error and try again.

Any hints / suggestions ?

The installer file at https://repo.anaconda.com/miniconda/Miniconda3-4.7.12-MacOSX-x86_64.sh exists and the checksum is good. Perhaps try again, it’s possible that your download was corrupted.

Thanks for your reply. I have tried again a couple of times. Immediately falls over with same error, viz “Unsupported scheme”. Wondering if it is a permissions thing, or I have to run it as some kind of (more) privileged player on my Mac in Terminal ? Or I need to be running Catalina ? Sorry - not a very sophisticated Unix player here…

Ok I think I know what’s happening. MacOS is a strange flavor of Unix which is why this doesn’t work. I will update the install script as soon as I can.

Thanks ! Sorry to be a pain - but might be helpful for others I guess.

It’s not a problem. rsudp should work on as many systems as possible and this code change will be a fairly easy modification to allow for that.

Ok it’s updated now. To pull the updates down from GitHub without re-downloading the whole thing, try this:

cd [rsudp directory]
git pull
bash unix-install-rsudp.sh

where [rsudp directory] is the path to where rsudp is located, like /Users/ian/Downloads/rsudp or something similar.

Let me know if you have further errors.

ok - thanks for this - but still have a problem. Tried it 3 times - get the same each time at 48.1M of Total / Received…

billjohnson:rsudp robincurtis$ bash unix-install-rsudp.sh
Looking for existing installation…
Starting install script.

Raspberry Shake UDP client installer v0.2
Ian Nesbitt, Raspberry Shake S.A., 2019

Please follow instructions in prompts.
Press Enter to continue…

This script will need to use or create a directory to store miniSEED data and screenshots.
Common choices might be /Users/robincurtis/rsudp or /Users/robincurtis/opt/rsudp
Where would you like the rsudp output directory to be located? You can use an existing one if you would like.
Press Enter when done (if no input is given, the script will use /Users/robincurtis/rsudp):

No directory was provided, using /Users/robincurtis/rsudp
Using existing directory /Users/robincurtis/rsudp
Looking for conda installation…
Cannot find conda installation; will try installing miniconda3.
Found Darwin environment on x86_64.
Install location: /Users/robincurtis/miniconda3
Ready to download miniconda3
The download could be as large as 200 MB.
Press any key to continue or Ctrl+C to exit…

% Total % Received % Xferd Average Speed Time Time Time Current
Dload Upload Total Spent Left Speed
100 48.1M 100 48.1M 0 0 3901k 0 0:00:12 0:00:12 --:–:-- 4021k
Something went wrong downloading miniconda3. Check the error and try again.
billjohnson:rsudp robincurtis$

Ian - Just to let you know - I manually installed Miniconda3, and then re-ran unix-install-reudp.sh and everything appears to have installed.

Just got to arrange for our Shake to speak to me on Port 8888.

Thanks for your help.

2 Likes

How to find UDP port for Windows:

Start your command prompt
Type ipconfig
Next type netstat -a for a list of your various port numbers

If someone need…Marco

2 Likes

Hi Robin,

Apologies for the delay. Manually installing Miniconda was the right step here, and I’m glad you have it installed now. I’m still not sure what OSX is expecting, because the command that’s failing is working on other versions of OSX. I will look into it again.

Thanks for the feedback and I’m looking forward to seeing some images of the stream you set up.

Ian

Hi @iannesbitt

Rsudp aborted at the start of Nov 30 as the computation of newday passes November 31 to UTCDateTime. This results in a ValueError as there is no November 31.

The offending line in c_write.py:
self.newday = UTCDateTime(self.y, self.m, self.d + 1, 0, 0)

can be replaced with:
self.newday = UTCDateTime(year=self.y, month=self.m, day=self.d) + 24*60*60

This should work for all cases with the possible exception when a leap second is added to a day.

diff --git a/rsudp/c_write.py b/rsudp/c_write.py
index ec505d1..c48dc7e 100644
--- a/rsudp/c_write.py
+++ b/rsudp/c_write.py
@@ -62,7 +62,7 @@ class Write(Thread):
self.st = UTCDateTime.now()
self.y, self.m, self.d = self.st.year, self.st.month, self.st.day
self.j = self.st.strftime('%j')
- self.newday = UTCDateTime(self.y, self.m, self.d + 1, 0, 0)
+ self.newday = UTCDateTime(year=self.y, month=self.m, day=self.d) + 24*60*60
if new:
self.last = self.newday
else:

Oh good catch, that was a lazy mistake. Thanks.

I think it’s also possible that this can be achieved by using a datetime.timedelta(days=1). I will also have a think about how to deal with leap seconds, because I think errors there can be easily avoided too, just by hard-coding the hour field to 1. The day, month, and year are the only fields that matter in the file naming, so adding an hour to the newday field should be safe.

@jkline These changes have been merged and are available in version 0.4.1, which is now available on GitHub.

Version 0.4.1

Release notes are here: https://github.com/raspishake/rsudp/releases

In addition to two bug fixes, there is also a new module that can automatically post to Twitter when there’s an alert, and then post a plot screenshot after that. See example here: https://twitter.com/paleosurface_eq

In order to set up the Twitter module, you will need to create a Twitter developer’s account on apps.twitter.com associated with the account you’d like tweets to post to. Twitter will need to approve the account (usually within hours).

Then you will need to create an “application,” and create access tokens for that application. Copy the API key, API secret, access token, and access secret to the respective fields in the rsudp_settings.json file. It should go without saying but do not share these with anyone.

Now you should be ready to post up-to-the-second sudden motion alerts to Twitter! If your plot module is enabled and it is saving eq_screenshots then the Twitter module will also post a seismogram or seismogram-spectrogram image of the event shortly after the alert goes out.

To update

On unix:

git pull
bash unix-install-rsudp.sh

During the update, your settings file will be backed up and a new settings file will be created with the Twitter authentication fields. The backed up version will be ~/.config/rsudp/rsudp_settings.json~ on Mac or ~/.config/rsudp/rsudp_settings.json.~1~ on linux.

on Windows:

conda activate rsudp
pip install -U rsudp
cp ~/.config/rsudp/rsudp_settings.json ~/.config/rsudp/rsudp_settings.json~
rs-client -d default

The cp command will back up your old default settings file, and the rs-client -d default command will install the new settings file with the Twitter authentication fields. You will need to copy settings over from the old file to the new one.

Hi @iannesbitt

Is there a way take information from multiple stations at once?

Hi @JacobA, yes, this is possible on machines with the CPU power to handle it. In my testing I think I successfully ran six separate instances at once for a week or so. You should be able to do it by following these steps:

  1. Set up each station to forward data to a separate port on the client computer

  2. Create separate settings JSON files with station codes corresponding to the port to which each station is forwarding, like so:

    RAAAA.json
    RBBBB.json
    RCCCC.json
    
  3. Activate the rsudp conda environment created during setup:

    conda activate rsudp
    
  4. Start separate instances of rsudp for each station/port (either using separate prompts/terminals for each or by starting independent threads from the same terminal. On unix:

    rs-client -s RAAAA.json &
    rs-client -s RBBBB.json &
    rs-client -c RCCCC.json &
    

    On Windows, from Anaconda Prompt with rsudp environment activated:
    (note that I have not tested this)

    start-job -scriptblock {
    rs-client -s RAAAA.json
    rs-client -s RBBBB.json
    rs-client -c RCCCC.json
    }
    

Let me know if you have issues with any of this.